 English


Mounting a network switch on a wall can be a practical and space-saving solution, especially in environments where floor space is limited or you want to keep cables neatly organized. Whether you’re setting up a home office, a small business network, or upgrading your existing setup, here’s a detailed guide to help you mount your Ethernet PoE switch securely:
Selecting the optimal location for your PoE network switch is crucial. Consider the following factors:
Gather the necessary tools and equipment before you begin:
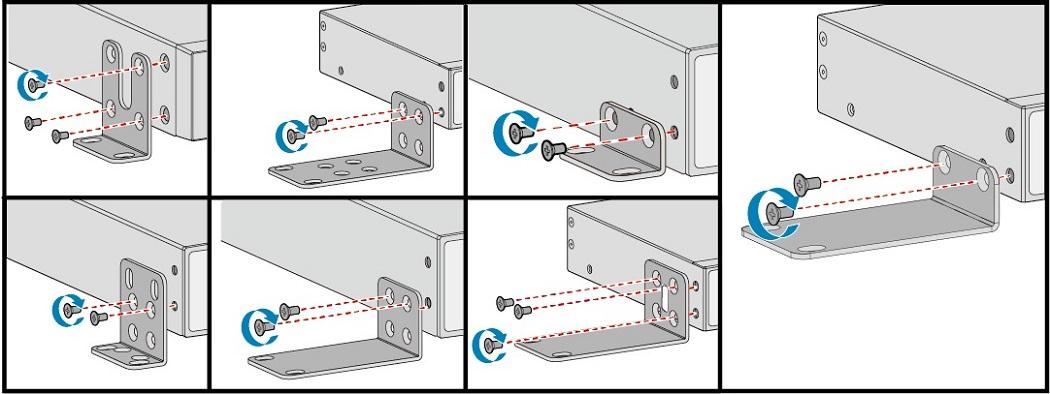
Before mounting, power off the unmanaged 10/100M 8 port poe+ switch and disconnect all cables. Attach the wall mount brackets securely to the switch following the manufacturer’s instructions.
Hold the switch against the wall in your chosen location. Use a pencil to mark the positions of the mounting holes on the wall. Use a level to ensure the switch is aligned horizontally.
Depending on your wall type, drill pilot holes for the screws and install wall anchors if needed. Wall anchors provide extra support, especially in drywall or plaster.
Align the mounting brackets on the switch with the drilled holes on the wall. Securely fasten the switch to the wall using screws. Avoid over-tightening to prevent damage.
Once the switch is securely mounted, reconnect the Ethernet cables from your devices to the switch ports. Ensure each cable is securely plugged in. Connect the power cable to the switch and plug it into a nearby power outlet.
Power on the PoE network switch and connected devices. Test network connectivity to ensure all devices are properly recognized and can communicate with each other.
Wall mount poe switch can optimize space and improve the efficiency of your network setup. By following these steps, you can ensure a secure and organized installation tailored to your specific needs.
Proper installation and maintenance of your network equipment are essential for optimal performance and longevity. Ensure you follow manufacturer guidelines and safety precautions throughout the installation process.
 E-Mail Us
 Call Us
 Address
5F, Block5, GuangmingGu Industrial Park, Matian Villiage, Guangming Disitrict, Shenzhen, China


 IPv6 network supported